Tattoo ink
Net Weight: 5ml/bottle
Bright color, easy to color, without any harm, color stable water color, saturation Gauguin has affinity Skin easily absorb pigment, no fade after the repair, color is very positive.
ingredient:water,alcohol,Antiseptic,fluid,Propylene glycol,Glycerol,glycerin
Instructions included: Yes
Manufacture Country: China
Tattoo power supply
Material: Alloy
Rated Power:23W
Input Voltage : 90-265V AC50-60HZ
Output Voltage: 0-18V
ABS plastic shell has good strength to give power best protection, very durable for long term use.
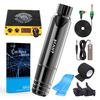
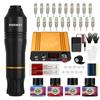
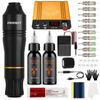
Tattoo Machine
Description of Tattoo Machine
Material: Aircraft aluminum alloy
Features of Tattoo Machine Kit:
* The tattoo machine uses tightly wound pure copper coils to ensure a stable power output.
* The tattoo power kit can work for a long time with better heat dissipation and lower temperature rise.
* The tattoo machine is small in size and light in weight, allowing for extended use without fatigue.
* Our tattoo power supply enables precise voltage setting and regulation.
* The complete professional tattoo kit is the perfect choice for beginners and learners.
Package includes:
1 X High Quality Tattoo Machine For Lining And Shading
1 X High Quality Tattoo Machine Grip
1 X Clip Cord
1 X Foot Switch
1 X High Quality Power Supply System
1 X High Quality Power Supply Cord
1 X 5ml 6colors Tattoo Inks
1 X 10 x Grommet Keep Needle Steady
10 x Rubber Bands Avoide Machine
10 x O-Ring Sure Spring Smooth
3 x Adjustment Tool Set For Machine
10 color cups
1 X 5R Blue Disposable Tattoo Needle Tips
Professional use:
1. Use the small tools to assemble the tattoo nozzle tips.
2. Install the grip onto the tattoo gun.
3. Place the grommet on the needle stick to keep the needle steady.
4. Insert the needle into the tattoo grip, ensuring the bottom of the needle is on the needle stick.
5. Use the rubber band to secure the tattoo gun and needle together to prevent needle swing.
6. Adjust the grip to allow the needle to protrude from the nozzle tip by 1-1.5mm.
7. Connect the clip cord to the tattoo gun.
8. Plug the foot switch and clip cord into the power jack (caution: make sure to plug them into the correct jacks, otherwise the power may be damaged).
9. Turn on the power, step on the foot switch, and the tattoo machine is now operational.
ATTENTION:
1. Do not handle any part of the plug or appliance with wet hands.
2. Do not unplug by pulling on the cable. To unplug, grasp the plug, not the cable.
3. The main power supply should be located in a position inaccessible to children. Children should be supervised to ensure that they do not play with the appliance.
4. Do not place the tattoo kit in damp, extreme, or long-term hot, cold, or wet conditions or any other unfavorable conditions.